Water-Level Perspectives: Shooting Reflections at the Ecotours Drinking Stations
In the lexicon of wildlife photography, there is one composition that instantly separates the snapshot from the portfolio piece: The Mirror Reflection.
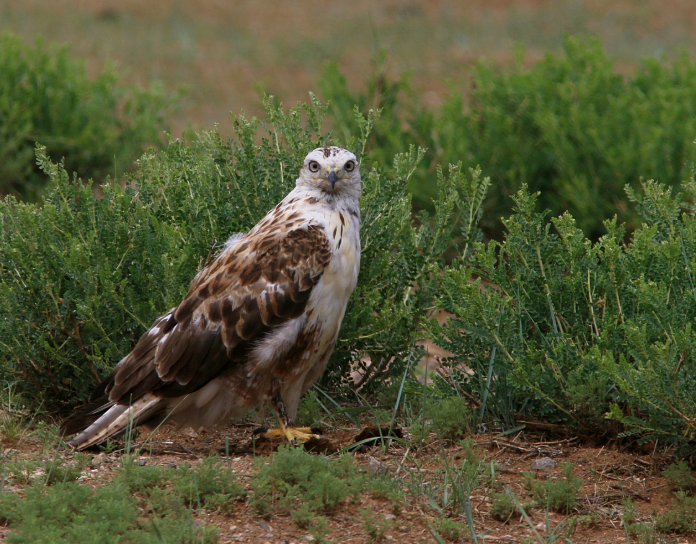
There is something primal and mathematically satisfying about a perfect symmetry—a European Roller touching its beak to a still pool, creating a seamless double image against a creamy, diffused background. It transforms a biological document into fine art.
But achieving this perspective is historically a nightmare. To get a true "water-level" shot, the front element of your lens needs to be roughly three inches off the ground. Traditionally, this meant lying prone in the mud for six hours, dressed in a ghillie suit, craning your neck at a 45-degree angle until your vertebrae locked up, all while praying the wind didn't shift and flush the bird.
In the Kiskunság and Hortobágy regions of Hungary, Ecotours has engineered the physical suffering out of the equation.
They have pioneered a network of "Sunken Drinking Stations"—permanent, architectural hides buried into the earth. These structures lower the photographer below the ground level, placing the lens shelf exactly at the waterline.
For the technical photographer, this setup is a playground. It removes the variables of biomechanics and camouflage, allowing you to focus entirely on the physics of light, water, and optics. Here is a technical breakdown of why these hides produce some of the cleanest images in the European wild.
Part I: The Geometry of the "Infinity Pool"
The mistake most DIY water hides make is the background. If you dig a hole and put a tray of water in front of it, you often end up photographing the bird against the mud bank two meters behind it. The result is a sharp bird against a sharp, messy background.
The Ecotours Engineering: Ecotours designs their drinking stations like infinity pools.
-
The Elevation Drop: The water level is elevated slightly relative to the background terrain, which slopes away.
-
The Distance Ratio: By placing the hide low and the background far away (50 to 100 meters), they utilize the principle of hyperfocal distance in reverse. Even at f/8, the background is rendered as a smooth, uniform wash of color (bokeh).
-
The Isolation: When a Hawfinch or a Turtle Dove lands at the water’s edge, it is isolated in a narrow plane of focus. The reflection is not interrupted by reeds or dirt; it floats in a sea of color.
This geometric precision is what gives Ecotours images their signature "studio" look. It’s not Photoshop; it’s physics.
Part II: The Glass Interface – Shooting Through the Water Line
The defining feature of the Ecotours experience is the panoramic Beam Splitter Glass (One-Way Mirror).
In a drinking station hide, the glass extends almost to the water's surface. This allows for a unique photographic technique: The Split-Level Shot.
The Technical Advantage
Because the lens sits on a shelf just centimeters above the water:
-
Refraction Minimization: You are shooting parallel to the water surface, not down through it. This maximizes the clarity of the reflection.
-
The "Hero" Angle: Small birds like Goldfinches or Linnets, which are usually photographed looking down from a standing height, are suddenly rendered as giants. You are looking up at them. This psychological shift in perspective makes the subject look powerful and regal.
-
Sensor Capability: Modern sensors (Sony A1, Canon R5) have massive dynamic range. The Ecotours glass cuts light by ~1.3 stops, acting effectively as a weak Neutral Density (ND) filter. In bright midday sun, this can actually be an advantage, allowing you to shoot at f/2.8 or f/4 without maxing out your shutter speed (1/8000s) or losing highlight detail in the white feathers of an Egret.
Part III: The Behavior – "Sipping" vs. "Bathing"
The Drinking Station hides offer two distinct photographic opportunities, each requiring different camera settings. Ecotours guides act as "directors," predicting the behavior so you can adjust your shutter speed before the action happens.
https://ecotourswildlife.co.uk/
1. The Drink (The Static Reflection)
-
The Behavior: A bird lands, checks for predators, and leans down to sip. It is a moment of stillness.
-
The Shot: This is the "Art Shot." The water is still. The reflection is a perfect mirror.
-
Settings Strategy: Drop your ISO. You don't need 1/3000s here. 1/500s or 1/1000s is sufficient. Stop down to f/5.6 or f/6.3 to ensure both the bird’s eye and the reflection’s eye are within the depth of field.
2. The Bath (The Chaos)
-
The Behavior: Once thirst is quenched, hygiene begins. A Blackbird or a Jay will crouch and explode into a frenzy of wing beating to clean its feathers.
-
The Shot: This is the "Action Shot." Water droplets fly everywhere. The reflection is shattered into abstract art.
-
Settings Strategy: Maximize shutter speed. You need 1/2500s or faster to freeze the individual water droplets. Open your aperture to f/2.8 or f/4 to isolate the exploding water from the background. Switch drive mode to High+ (20fps) because the "perfect" water shape lasts milliseconds.
Part IV: The "Studio" Setup – Curation of the Perch
The water is the stage, but the perch is the prop. Ecotours guides are meticulous about "perch management."
A bird rarely lands directly in the water. It lands on a safety branch first.
-
The Swap: Ecotours guides can swap these perches based on the photographer's aesthetic preference. Want a clean, minimalist look? They install a smooth, weathered piece of driftwood. Want texture? They bring in a moss-covered log or a branch with lichen.
-
The Distance: The perches are positioned at the perfect distance for a 300mm to 500mm focal length.
-
The Reflection Calculus: The guides position the perch at a height where the reflection is not cut off by the bottom of the frame. There is nothing worse than a perfect bird with a headless reflection. Ecotours setups are measured to ensure the full geometry fits in the viewfinder.
Part V: The "Golden Hour" Workflow
Light is the brush. The Drinking Stations are strictly oriented by compass to exploit specific lighting conditions.
The Backlit Session (Morning Hides)
Some Ecotours hides face East. This sounds counter-intuitive (shooting into the sun), but it is designed for Rim Lighting.
-
The Technique: As the sun rises behind the bird, the water droplets from bathing are illuminated like diamonds against a dark background. The bird is outlined in a halo of gold.
-
Exposure Tip: The camera’s meter will try to brighten the scene, blowing out the rim light. You must use Negative Exposure Compensation (-1 to -2 EV) to turn the background black and let the rim light pop.
The Front-Lit Session (Afternoon Hides)
Other hides face West. These are for the classic, saturated color shots.
-
The Technique: The low afternoon sun hits the bird directly. This reveals the iridescent structural colors of species like the European Starling, Kingfisher, or Roller.
-
The Glass Benefit: The beam splitter glass eliminates glare from the sun hitting the camera lens, acting as a giant lens hood.
Part VI: Gear Selection – The Zoom Revolution
In the past, the 600mm prime was the only tool for birding. In an Ecotours Drinking Hide, the 600mm can sometimes be a liability.
The Proximity Paradox: Because the water is so close (3-4 meters), a large bird like a Goshawk or a Grey Heron will fill the frame—or overflow it—at 600mm. You will clip the reflection.
The Gear Recommendation: The 100-500mm or 200-600mm Zoom is the MVP (Most Valuable Player) of the drinking station.
-
Versatility: You can shoot a Blue Tit at 600mm, then instantly pull back to 200mm when a Sparrowhawk slams into the water.
-
Composition: Zooms allow you to "zoom with your feet" without moving. You can frame the shot to include exactly the amount of reflection you want, adhering to the Rule of Thirds or Golden Ratio.
Macro Opportunities: Don't forget the small stuff. Frogs, dragonflies, and water snakes often patrol the edge of the glass. A 100mm Macro lens allows you to shoot these subjects inches away from the glass, creating underwater/overwater split shots if the water level permits.
Part VII: Post-Processing the Reflection
Shooting through glass and water introduces unique challenges for the RAW file. Here is the Ecotours-recommended workflow for these files:
-
De-Haze (Sparingly): The glass and the water evaporation can create a micro-haze. A gentle touch (+10) on the Dehaze slider in Lightroom brings back the "pop."
-
Contrast Management: Wet birds are high contrast (dark wet feathers, bright white specular highlights on water). Open the shadows, but be careful not to blow out the whites.
-
The "Flip": For artistic impact, try flipping the image 180 degrees vertically in post. A perfect reflection often looks like a surrealist painting when inverted.
-
White Balance: The beamsplitter glass usually has a very slight cool or warm tint (depending on the coating batch). Shoot in RAW and set White Balance using a neutral grey card or the bird's white feathers during the edit.
Part VIII: The Ecological Bonus
While we focus on the technical, the biological aspect is the engine. Why do the birds come?
In the hot, dry summers of the Hungarian Puszta, water is scarce. These drinking stations are oases.
-
Volume: It is not uncommon to see 30-40 species in a single day.
-
The Predators: Where the prey drinks, the predators hunt. Sparrowhawks and Goshawks know these spots. The "panic flush"—when all the songbirds explode off the water simultaneously—is your cue to increase shutter speed and look for the raptor.
Ecotours maintains these ponds year-round. This means the birds are habituated to the location (but not the people). They view the pond as a safe, reliable resource.
Conclusion: The Ultimate Control
Wildlife photography is usually defined by a lack of control. You can't control the light, the animal, or the distance.
The Ecotours Drinking Station returns control to the photographer. By fixing the low angle, managing the background, and utilizing the one-way glass to eliminate human disturbance, they have created a scenario where the only limit is your creativity.
It is a studio where the subjects are wild, the light is natural, and the results are consistently world-class. For the photographer chasing the perfect reflection, there is no better setup in Europe.
Sidebar: The "Reflection" Gear Bag
-
Lens: 200-600mm f/5.6-6.3 (Sony), 100-500mm f/4.5-7.1 (Canon), or 180-600mm (Nikon). Primes are great, but zooms offer compositional flexibility for reflections.
-
Support: Gimbal Head (Wimberley or similar) mounted on the hide’s shelf. Ball heads are too slow for the bathing action.
-
Filter: Circular Polarizer (CPL)? Generally NO. You want the reflection. A CPL cuts reflections. Only use it if you want to see through the water to the bottom (e.g., for frogs).
-
Focus Limiter: Set your lens to "3m - 10m". You don't want the AF hunting on the distant background if you miss the bird.
Sidebar: Pro Tip – The "Wet Look"
The most dramatic photos happen after the bath. When a bird exits the water, it flies to a nearby perch to shake off (the "rousing").
-
The Shot: A wet bird shaking creates a halo of water spray.
-
The Technique: As soon as the bird leaves the water, shift your focus to the "drying perch" (the guide will point it out). Pre-focus there. Wait for the shake. Fire the burst. Backlit, this is a winning shot.